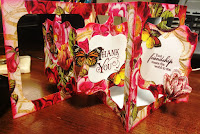
I am honored and flattered to be asked to participate as a Guest Designer for Karen Burniston and her amazing Pop It Ups dies. In addition to being honored and flattered, I am totally psyched about this challenge. Shelly Hickox (who totally rocks in all ways) has chosen as the theme for this challenge "Girly or Ghouly." The designers are asked to chose either a girly theme or a ghouly theme and make a card. But I was thinking . . . why choose? How could I make a card that embraced both the light side and the dark side.
I had created a
staggered accordian card for a friend's birthday a few weeks ago, and I thought I would like to try my hand at another staggered accordian card. The thing with accordian cards is they usually have a pretty side and a plain side (with the exception of the front panel, which can have two sides). I tend to write my greeting and sign my name on the boring back side, and leave the front side to be displayed by my friends for months on their mantles or bedside tables until they deteriorate with age. (I like to imagine my friends never throw away cards I make for them.)
And here is the link to the instructions that Karen gives for a staggered accordian card.
Anyway, here's what I made:
The "Girly" side:
What little girl doesn't like dressing up for Halloween and gathering as much chocolate as she can carry? It's in our DNA.
The "Trick or Treat" sentiment is by Stampin Up, and the girl with the pumpkin is a stamp from Oxford Impressions.

This little girl in the witch's costume is a stamp from Artistic Outpost as is the butterfly stamp. I don't know if you tell from the photo, but the moon and the butterflies were painted with Wink of Stella.

And finally the third panel . . . oh wait. What is that peeking from behind the third panel with its gnarles branches. It looks like a segue to . . .
The "Ghouly" side:
While the "girly" side was very stampy, the "ghouly: side has some amazing new Halloween dies from Karen Burniston. Let's break it down for a closer look:

Again, the "Trick or Treat" stamp starts us off. Look at those great dies at the bottom. The tree is actually behind the cemetery, and the cemetery is bowed just a little bit to give it some depth and dimension. They are both from the Halloween Scene die set. (Note how I put some white Wink of Stella on the grave stones to reflect the moonlight.)

The bats are also dies from the new Halloween Scene die set. Where I had pretty butterflies on the "girly" side, I have bats on the "ghouly" side.

I also wanted to show you a close-up of the moon, which stands out better against this black background. I wish you could see the Wink of Stella that makes this really shimmer. Oh well.

The final panel has a couple of things going on. Up at the top of the card, there is a spider hanging from a spider web from that same Halloween Scene die set. I cut the spider web die cut in half because I only needed part of it. I also stamped the spider twice so I could glue a piece of thread--I mean "web" --between the layers.

At the bottom of the panel is the fence from the brand new Iron Fence Pop-up die set. This time I used the fence flat on the card, but you should
check out what else this fence can do. Next time . . . next time. The bird (raven?) is also from the same die set.
See that green bush that the raven is in front of? That is actually the back side of the girl holding a pumpkin. Which brings me to my confession.
I actually should not have anything where I have the girl holding the pumpkin because it hinders the moving part of that panel from folding absolutely flat. However, this card has so much stuff in it that it's never going to fold flat, and it's so pretty that it will not need to go into an envelope. (Because I'm keeping it!) But please keep that in mind if you make an accordian fold card that you want to send to someone.
Here is how the two sides of the card would look sort-of folded. Note that the Girly background shows through on the Ghouly side and vice versa:

The Poem:
The verse that is in this card, the Halloween poem, was written just for this card! (I needed a unifying theme.) Feel free to use it in your Halloween cards if you like, but (obviously) if you post it anywhere, please give me credit. Here it is all put together:
Lastly, I thought you might enjoy seeing how I built up the background paper for the girly side of the card.
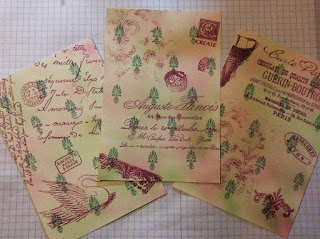
I started with a tiny acrylic stamp in the MISTI, See how I marked the grid on the top (outside) of the MISTI. That way I knew exactly where the stamp would go every time. I placed the stamp where it needed to be, and then stamped all three background sheets, one at a time. Then I moved the stamp to the next position and stamped all three backgrounds again. This was the first time I had tried this with my relatively new MISTI. I could not believe how easy this was!
And then I had three identical backgrounds, which are supposed to be reminiscent of Victorian walpaper, or something like that.
I randomly stamped Oxford Impressions stamps in the purply color and then airbrushed green and pink with Copic markers. So much for Victorian wallpaper.
Then I stamped, in green, a linen background stamp to give it a deeper green color and some great texture. Finally, I white embossed some Stampin Up leaves and flowers.
The ghouly background was easier, yet way messier. I basically used the wrinkle-free distress technique with reinkers and a spray bottle on watercolor paper, but then while the paper was still wet I added some teal and purple shimmer sprays. This card has some shimmer to in real life. It took a while to dry, but I let it dry naturally so the shimmer would be as shimmery as possible.
That's it. I hope you liked my card. Many thanks to Karen Burniston who asked me to serve as a guest designer for this challenge and to Shelly Hickox for coming up with such a great theme. I had a blast!!! Thanks, Karen! Thanks, Shelly!
Cyndi


