With all the drama that's been going on in my house, I had to get back to my peaceful studio.
This card is inspired by yesterday's SplitcoastStampers sketch challenge (my favorite of all the challenges) and a friend's birthday that's coming up next week. I really wanted to try this sketch, but I had choir practice last night, beading group, yada, yada, yada . . . Anyway, I got up this morning an hour early so I could get back into the studio before my sister Shelby woke up and the drama recommenced.
I used Stampin' Up!'s Eastern Influences set for the central image on this card and an old Anna Griffin sentiment that I have had for a long time. I like that it's such a small sentiment, because I don't always save room for a big “Happy Birthday.” The paper is Basic Grey's "Eva" that I got from Jacksonbelle Embellishments.
An important thing to know about this story is that I have also been trying to save enough time in the morning to eat a healthy breakfast, so I had oatmeal cooking real slow on the stove. Oatmeal is fairly low maintenance, and I was pretty sure I could keep an eye on it while watercoloring. Unfortunately watercoloring, for me, is very absorbing--almost spiritual, and . . . yes, I forgot about the oatmeal until I smelled it burning. (Always microwave oatmeal when watercoloring.)
Anyway the smell of burned oatmeal made the kitties crinkle their noses in disgust and woke Shelby, who wandered into my studio to see what I was up to. I didn’t realize she had never watched me make a card before. She shook her head, went back into her bedroom closet (having to crawl over furniture in order to get to it) and dug out a box of store-bought greeting cards. She presented them to me unceremoniously and told me I could help myself anytime I wanted and that she knew where she could get more if we ran out. [Sigh].
Cyndi
(The unappreciated artist)
Wednesday, September 17, 2008
Shelby is here . . . with her furnishings.
My sister Shelby has moved into my house. I understood that when you add a new person some disruption to a household occurs, but I had no idea . . .
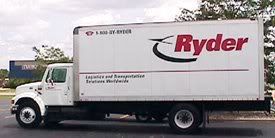
The good news is that by the time I went over to her now-former house to pick Shelby up, she had the giant Ryder truck loaded and ready to go. Since her ex-husband was paying for the move, she hired the youth group from her church to pack her up and load the truck, and she paid them well for it with the blank check Art (her ex) gave her. I think it boiled down to a ski trip for the entire youth group in January.
It took us what seemed like forever to drive from Roanoke to Memphis with the giant Ryder truck lumbering slowly down the interstate, and me following in the station wagon. Part of what made the journey so slow was the speed at which she was comfortable driving the giant Ryder truck, and part of it was due to the giant bottles of water she would purchase (and subsequently drink) every time we stopped. And we had to stop a lot . . . because of the giant bottles of water. But I shouldn't complain; after all I could have been the one stuck in the truck.
I'm not being judgmental, but one of the reasons Shelby may have had for drinking so much water and having to stop so much may have been the truckers. The reason she had to stop at truck stops was because, she alleges, they have nicer rest rooms. The reason she had to wear indecently short shorts for a woman her age was because truck stops have truckers. Now I would admit that Shelby has nice legs, but apparently she did not want confirmation from me. The friendly trucker drivers told Shelby everything she wanted to know each time she stepped down out of the big Ryder truck and languidly stretched the weariness of the road out of her taught muscles. Divorce is hard on a person, and it doesn't hurt a body to accept a little positive reinforcement now and again.
There was a lot of furniture in that van. And now it's mostly all in one bedroom and a bathroom in my not-so-large house.
You won't believe how she's got that furniture arranged. She's got her queen-size bed pushed into a corner at the far side of the room and has about 14 inches on the right side of the bed to get in and out. She has two large dressers stacked one on top of the other and uses a footstool, a chair, and a "fairly" sturdy table as a ladder to get into the top drawers of the top dresser. Right beside the stack of dressers is a computer desk that also houses her television, her good china, silverware, and stemware. Because it won't fit on the computer desk, the printer is located across the small bedroom on the dining room table; the printer is beautifully flanked on either side with ornate sterling silver candelabra. Thank goodness the closet in that room is large--because four of her six dining room chairs are squeezed in along with a lot of clothing and three big boxes. The other two chairs contribute to the furnishings of the bedroom, one at the computer, and one at the dining room table.
You would think in a room that crowded with furniture, a woman would leave her nick-nacks packed in a box, wouldn't you? But a lot of them are proudly displayed on the several end tables in the room. Others that are not in her bedroom have been placed on the several end tables that now are crowded into the bathroom under a large sofa-sized painting of a serene farmhouse and cows.
Some people don't believe in storage facilities.
Cyndi
Wednesday, September 10, 2008
Ryder Truck!!!
Y'all are not going to believe this. I rented a station wagon to come here to Virginia to pick up my sister and make sure that we could get all her clothes, along with the personalty she needed, to make a new life for herself in Memphis. Apparently Shelby thought she needed more personalty than she told me about on the front end. She has rented a Ryder truck--not the smallest one either.
"Where in my house are you planning to put everything?" I was trying to stay calm. Trying to be reasonable. Wondering how I was going to explain this to Bob who was already having to get used to the idea of having his quiet home invaded. "I'll make it fit. Don't worry." I can't help it; I'm worried.
Meanwhile, my mom and I are having a great visit. Her new condominium is just lovely! The photo is some art from her apartment. Isn't that cool! I'm going to use it as an inspiration piece when I get home.
Speaking of inspirational, you just don't know how I've missed the mountains of Virginia. After I break it to Bob about his sister-in-law's big furniture move in, I will tell him my great idea about retiring to Floyd, Virginia (still dreaming-distance into the future). He'll probably be ready to retire as soon as he sees that Ryder truck.
Cyndi
Friday, September 5, 2008
Pretty Paper
Thursday's Splitcoaststampers Ways to Use It challenge is to use some of your specialty paper. I bought the paper for this card from my local scrapbook store, Eclectica, a couple of weeks ago. It's so yummy I almost had it for lunch that day, but I'm glad I saved it.
Usually the cards I make are 4-1/4" X 5-1/2" (commonly referred to as A2), but this one is 5" X 7" because I didn't want to cut this paper up too much. I used some more faux stitching (is the border stitch called a couching stitch?--I don't remember) and made some more of those cute butterflies. The sentiment in the middle of the diamond is from the Verve set Beautiful You and says "No winter lasts forever. No spring skips its turn. --Hal Borland." The buttons are from a giant stash of buttons that I have, but I never use.
This is my last post before I leave on my week-long trip to see my mother and to pick up my sister. I am so excited that I have actually packed my suitcase a whole day before I leave! My clothes are usually pulled warm from the dryer a half hour before we leave.
Funny story: My grandmother used to pack so far ahead of time that she would have nothing to wear. She would pull things out of the suitcase, wear them, wash them, and repack them . . . for several weeks.
Cyndi
Thursday, September 4, 2008
Paper Engineered Butterfly Wings
Wednesdays may be the best day of the week on Splitcoaststampers.com. Not only do they post a new tutorial of a project or a technique, but Wednesday is sketch challenge day. And here is my card based on this week's Sketch Challenge.
First of all, let's talk about the faux stitching. For those of you not acquainted with this technique, the artist pokes a line of holes in the paper with a paper piercer (or a pin or a needle or beading awl or whatever sharp implement you may have in your stamping space) and then draws between the holes with a pen. Here I used a Signo white gel pen, which is ideal, but if you want your "thread" to be another color, use that instead. Now some stampers use a piercing template or a ruler to be sure that their "stitching line" is absolutely straight. Me, I just punch the holes in a relatively straight line. I mean, if I were to either hand sew or machine stitch on a card, I'm not kidding myself that my stitches would be any straighter than this. I'm just not that good of a seamstress.
Please note that the above card shows examples of "faux machine stitching," both in the straight stitching around my focal image and the zigzag stitch on the red stripe at the bottom. Why is faux machine stitching any different than regular faux stitching? you may ask. It's because I intentionally added an additional layer of faux stitching (bottom left-hand corner) to resemble what happens when you run the machine forward and backward at the end (or the beginning) of a line of stitching to lock the stitch. Just another whimsical detail I thought would be funny.
But I digress. This card was actually pretty easy to make. The main image and the butterflies stared out as Barely Banana paper, and I sponged them with Summer Sun and Ruby Red inks. I used the Upsy Daisy stamp set from Stampin' Up! for the flowers and the salutation. The butterflies are punched with a Martha Stewart punch (the only Martha Stewart item in my entire house--it's actually a great punch, very easy to use).
Now for the paper engineering. I am often frustrated when I punch or cut out a butterfly, carefully glue just the body of the creature to my card so that the wings can flap freely, and then put in in an envelope where the Postal Service runs it through their machines and the card gets to the recipient with the wings crushed flat against the card. Now, I could either write something inside the card such as, "I hope you have the Happiest Birthday ever. Please pop up the wings of the butterfly so that they are as pretty as before they were mailed," or I could try something else. This time I tried something else.
Under each butterfly wing there is a strip of paper that measures approximately 3/8" x 1/16". Not only is it an extremely tiny piece of paper, but it is folded in half (making it even tinier) so that it can act as a springy hinge between the wing and the card base. Just a drop of glue on each side of the tiny hinge works like a charm.
How many times did I drop those stupid scraps of hinged paper? I lost count. Then I remembered that I had a pair of tweezers from Making Memories that I probably had never used. It came in a kit with the paper piercer from the second paragraph. WOW! That is a truly indispensable tool when it comes to working with paper that measures 3/8" x 1/16". It gripped the tiny paper effortlessly. I will have to remember that tool is in my arsenal.
On a final note, I wanted my butterfly wings to have just a touch of sparkle, so I painted them with SoSoft Fabric Paint by DecoArt.
It sounds like it was a very involved card, but it actually came together pretty quickly. I still had time to finish de-cluttering, and we now have room to squeeze my sister Shelby into the house when I bring her back from Virginia on the 14th. Although I was kind of dreading adding a person (and a fairly . . . uh . . . dramatic one) to our quiet home, I am really looking forward to spending time with Shelby. I think it's going to be a lot of fun.
Until next post,
Cyndi
Wednesday, September 3, 2008
Snowy Owl
Yesterday on Splitcoaststampers.com the color challenge was . . . any color you like -- as long as your card was monochromatic. As luck would have it, I just received Inkadinkado's Winter Birds from Jacksonbelle Embellishments, saw the image of the owl, and knew immediately that blue was going to be my color of the day
So after I had finished the evening's de-cluttering project (yes, there's more to go, but one must have art in one's life), I commenced with the stamping.
Starting with the small panel, I stamped the owl image with Night of Navy ink on glossy cardstock, set the ink with a heat gun, then colored in both the owl and the blue circle behind his head with a VersaMarker and embossed with clear embossing powder. Next I took my trusty rubber brayer, loaded it with the ink from a Baja Breeze ink pad and brayered the top and the bottom until there was just paleness in the middle. (The intent was to leave more white, but the brayering got away from me.) I used Pacific Point and again brayered the top and the bottom leaving even more in the middle. Finally I added some Night of Navy ink just to the top and the lower left-hand corner. Then I wiped the ink off the previously embossed owl and . . . wow! It looked so good except for the lower right-hand corner which somehow had a dot of white that the ink wouldn't stick to. No problem. That's why God gave us snowflake brads.
For the background piece, I stamped the "birds leaving a trail of Christmas cheer behind them" (hereafter known as "BLTCCBT") stamp in Night of Navy. Then I stamped the snowflakes from another clear stamp set (I think it's Inkadinkado, but I won't swear to it) using only VersaMark, and embossed them with the clear embossing powder. I used my brayer in the same way noted above and wiped the ink away from the flakes. Cool!
I originally matted the little owl with one navy piece 1/8 inch wider on all sides that my owl image. But while waiting for Bob to get off the computer last night so I could scan the card, I looked at it from across the room and I realized the owl should have a thicker mat. So I double matted with the same cardstock. I kind of like the double-mat look.
Special thanks go out to Michelle Zindorf for her work in raising the stamping bar, and then giving us all step-by-step instructions so we can use the "Zindorf Technique" as well. If you don't stalk her blog, you are missing something.
Tuesday, September 2, 2008
I'm a Black Magic Woman
Yesterday's Technique Lovers' Challenge at Splitcoaststampers.com was the "Black Magic" technique. Where the "magic pencil" technique uses Prismacolor pencils and odorless mineral spirits (I use Gamsol), the "Black Magic" technique uses them on black cardstock. Additionally, I usually use the Gamsol on a tortillon, which is a paper stub used for blending, but Lynn (the technique lovers moderator) told us we could dip our pencils directly into the Gamsol to soften the pencil lead. Sweet!
Basically with this technique, you take dark cardstock and stamp your open or line image in white or off-white ink, let the ink dry, then color it with the pencils dipped in the mineral spirits. The first time I tried this, however, I decided to emboss and image in white and then color it. Well, that didn't work out too well for me, so I went back and followed the actual directions. It worked like a charm!
I used my new Stampin' Up! Bella Toile stamp as a background, and it was so fabulous, I didn't want to cover up very much of it (I spent a lot of time coloring this), so I added a tiny little labeled sentiment and some very sheer ribbon.
Tonight, I will start cleaning up my studio, and my husband will start cleaning out his back bedroom/storeroom to make room for my sister Shelby who will be moving in with us in a few weeks. I am not really sure at this point where she will be sleeping, but we are going to have to do some major decluttering. As horrible as it sounds, I hope Shelby's husband will be retaining most of their possessions, because I don't know where she would to put them in my house.
Wish us all luck!
Monday, September 1, 2008
Stamping at Studio Suzanne
People have been telling me I need to blog. I don't know that this is true, and I doubt that I have anything interesting that others would like to know about. But it's free, so here goes.
Last Thursday I had a play date at Studio Suzanne, the home of Oxford Impressions rubber stamps. You'd like Suzanne. She's really nice and she has very cool art stuff in her house and in her studio. In fact, she has a blog: blog.oxfordimpressions.com; you should check her out.
After eating really good chicken salad and looking at everything in her studio, we settled in to stamp. I started out by choosing stamps from her Country Girl plate and paper I thought would look good with it. The image of the little girl is a photo stamp, which gives a very realistic impression. For best results you stamp with a not-too-wet/not-too-dry black ink pad onto not-too-matte/not-too-glossy coated cardstock. Luckily, I was at Studio Suzanne, and she had just the tools we needed to make this art project work.
Usually I take a few passes at photo image stamps before I get a good impression, but the little girl stamped great the first time . . . except for her feet. Tragically, I amputated her feet, but I hated to waste the impression so I went with it. This actually provided me a great opportunity for design. One of the pieces of background paper I was using had all these great flowers and leaves in it, which I then started cutting out. Not only did I cover up her feet, but I got a great corner for the picture of the house and even put a leftover leaf in the bottom left corner. (Leaves are hard to contain in the fall.)
Suzanne showed me how to paint (yes, actual paint) the edges with black and brown to look like burned edges. You paint and then you smear with your fingers. I realize I may need to practice this technique a little bit. It doesn't really look burned, but it does look edged, old, and definitely distressed.
When I got home I wasn't perfectly happy with black and white stamped images, so I colored my little girl and my house with markers. I also added the bottom trim and a coordinating ribbon at the top, so I can hang it in my studio, where it will look fabulous and remind me of a fun night spent with my friend Suzanne.
Hey! I just finished my first blog post! The pressure's off. Whew!
Subscribe to:
Posts (Atom)